java多线程
线程,是程序执行的最小单元(进程是基本单位)。
线程的状态机 状态机转换图
状态说明 新建状态(new) 当线程对象创建后,即进入了新建状态,如: Thread t = new MyThread();
可执行状态(Runnable) 当调用线程的start()方法时,线程即进入可执行状态。但是在这个状态下的线程,何时真正的执行取决于cpu的调度机制,并不是说执行了start()方法后,线程就立即执行了。
执行状态(Running) 当cpu开始调度处于可执行状态的线程时,换句话说,当可执行状态的线程获取到cpu时,线程才开始执行,进入到执行状态。也就是说,线程要进入到执行状态,就必须由可执行状态转变而来。
阻塞状态(Blocked) 处于执行状态的进程,会因为某种原因,暂时放弃对cpu的使用权,停止执行,此时就进入阻塞状态,直到进入可执行状态,线程才有机会重新执行。根据不同的阻塞原因,可分为以下三种阻塞:
等待阻塞:运行状态中的线程执行wait()方法
同步阻塞:运行状态中的线程获取synchronized同步锁失败
其他阻塞:运行状态中的线程执行sleep()方法或join()方法或者发出了I/O请求(当sleep()超时,或者join()等待线程终止或者超时,或者I/O处理完毕时,才会进入就绪状态)
死亡状态(Dead) 线程执行完了或者因为某些原因退出了run()方法,该线程会终止生命周期。
这里说的就只有五个状态,还可以从上面的阻塞状态分出一个TIMED_WAITING,该状态表示:
等待另一个线程来执行取决于指定等待时间的操作的线程处于这种状态。
Java中多线程的实现 在Java中,多线程的实现主要有四种方法:继承Thread类、实现Runnable接口、实现Callable接口、通过FutureTask包装器来创建Thread线程、使用ExecutorService、Callable、Future实现有返回结果的线程。
继承Thread类创建线程 1 2 3 4 5 6 7 8 9 10 11 12 class MyThread extents Thread @Override public void run () System.out.println("Hello world!\n" ); } } public class ThreadTest public static void main (String... args) Thread _thread = new MyThread(); _thread.start(); } }
实现Runnable接口创建线程 1 2 3 4 5 6 7 8 9 10 11 class MyThread implements Runnable public void run () System.out.println("Hello world!\n" ); } } public class ThreadTest public static void main (String... args) Thread _thread = new Thread(new Runnable()); _thread.start(); } }
以上两种方式的联系 其实Thread类,其实也是一个对Runnable接口的实现类,而在Runnable接口中,有这么一个抽象的方法
1 2 3 public interface Runnable public abstract void run () }
而在Thread类中,是这么实现run()方法的
1 2 3 4 5 6 7 8 9 10 11 12 13 14 15 16 17 18 public class Thread implements Runnable private Runnable target; public Thread (Runnable target) init(null , target, "Thread-" + nextThreadNum(), 0 ); } private void init (ThreadGroup g, Runnable target, String name,long stackSize, AccessControlContext acc) this .target = target; } @Override public void run () if (target != null ){ target.run(); } } }
而当我们使用第一种方式继承Thread类然后自己实现run()方法时,其实就是把上面的run()方法重写了,而第二种方法实现Runnable接口然后再作为Thread的构造参数传递,最后调用的就是自己的run()方法了,两种方式启示都是差不多的,都是没有返回值的 。
实现Runnable接口相对于继承Thread类来说,有如下的优势:
适合多个相同程序代码的线程去处理同一资源
可以避免由于java单继承特性带来的局限
增强健壮性。代码可以被多个线程共享,代码与数据是独立的。
实现Callable接口通过FutureTask包装器来创建Thread线程 Callable接口的定义如下:
1 2 3 public interface Callable <V > V call () throws Exception ; }
FutureTask包装器的相关 部分定义如下:
1 2 3 4 5 6 7 8 9 10 11 12 13 14 15 16 17 18 19 20 21 22 23 24 25 26 27 28 29 30 31 32 33 34 35 public class FutureTask <V > implements RunnableFuture <V > public void run () if (state != NEW || !UNSAFE.compareAndSwapObject(this , runnerOffset, null , Thread.currentThread())) return ; try { Callable<V> c = callable; if (c != null && state == NEW){ V result; boolean ran; try { result = c.call(); ran = true ; } catch (Throwable ex) { result = null ; ran = false ; setException(ex); } if (ran) set(result); } }finally { runner = null ; int s = state; if (s >= INTERRUPTING) handlePossibleCancellationInterrupt(s); } } } public interface RunnableFuture <V > extends Runnable , Future <V > void run () }
创建线程
1 2 3 4 5 6 7 8 9 10 11 12 13 14 class SomeCallable implements Callable <String > @Override public String call () throws Exception System.out.println("Hello world!\n" ); return "Hello world!" ; } } public class ThreadTest Callable<String> oneCallable = new SomeCallable(); FutureTask<String> oneTask = new FutureTask<String>(oneCallable); Thread oneThread = new Thread(oneTask); oneThread.start(); }
经过一系列构造调用后(上面没有列出),最终还是会调用到run()方法,然后在run()方法中再调用call()方法。
有关FutureTask可以考虑看下这篇文章 ,或者等我有空再写写。
使用ExecutorService、Callable、Future实现有返回结果的多线程 ExecutorService、Callable、Future三个接口实际上都是属于Executor框架。返回结果的线程是在JDK1.5中引入的新特征。可返回值的任务必须实现Callable接口。类似的,无返回值的任务必须实现Runnable接口。
执行Callable任务后,可以获取一个Future的对象,在该对象上调用get就可以获取到Callable任务返回的Object了。
注意:get方法是阻塞的,即:线程无返回结果,get方法会一直等待。
再结合线程池接口ExecutorService就可以实现传说中有返回结果的多线程了。
1 2 3 4 5 6 7 8 9 10 11 12 13 14 15 16 17 18 19 20 21 22 23 24 25 26 27 28 29 30 31 32 33 34 35 36 37 38 39 40 41 42 43 44 45 46 47 48 49 50 51 52 53 54 55 56 57 58 59 import java.util.concurrent.*; import java.util.Date; import java.util.List; import java.util.ArrayList; @SuppressWarnings("unchecked") public class Test public static void main (String[] args) throws ExecutionException, InterruptedException { System.out.println("----程序开始运行----" ); Date date1 = new Date(); int taskSize = 5 ; ExecutorService pool = Executors.newFixedThreadPool(taskSize); List<Future> list = new ArrayList<Future>(); for (int i = 0 ; i < taskSize; i++) { Callable c = new MyCallable(i + " " ); Future f = pool.submit(c); list.add(f); } pool.shutdown(); for (Future f : list) { System.out.println(">>>" + f.get().toString()); } Date date2 = new Date(); System.out.println("----程序结束运行----,程序运行时间【" + (date2.getTime() - date1.getTime()) + "毫秒】" ); } } class MyCallable implements Callable <Object > private String taskNum; MyCallable(String taskNum) { this .taskNum = taskNum; } public Object call () throws Exception System.out.println(">>>" + taskNum + "任务启动" ); Date dateTmp1 = new Date(); Thread.sleep(1000 ); Date dateTmp2 = new Date(); long time = dateTmp2.getTime() - dateTmp1.getTime(); System.out.println(">>>" + taskNum + "任务终止" ); return taskNum + "任务返回运行结果,当前任务时间【" + time + "毫秒】" ; } }
代码说明:
线程状态之间的切换 wait()、notify()、notifyAll()等方法 这几个放那广发都是定义在Object类里面的,而不是在Thread中。
原因:先梳理一下,这几个方法和synchronized一样,都是会对“对象的同步锁”进行操作的,wait会让当前线程释放它所持有的“同步锁”,否则其他线程获取不到的话就没办法执行了;其次,notify或者notifyAll也是根据“对象的同步锁”来确定是否要唤醒等待线程的。
负责唤醒等待线程的那个线程(我们称为“唤醒线程 ”),它只有在获取“该对象的同步锁”(这里的同步锁必须和等待线程的同步锁是同一个 ),并且调用notify()或notifyAll()方法之后,才能唤醒等待线程。虽然,等待线程被唤醒;但是,它不能立刻执行,因为唤醒线程还持有“该对象的同步锁”。必须等到唤醒线程释放了“对象的同步锁”之后,等待线程才能获取到“对象的同步锁”进而继续运行。
而“同步锁”是由对象所持有的,并且每一个对象有且仅有一个,所以这些函数就都是定义在Object对象中的。
wait():**让当前线程处于“阻塞状态”,直到其他线程调用此对象的 notify() 方法或 notifyAll() 方法,当前线程被唤醒,进入可执行状态
**wait(long timeout):**让当前线程处于“阻塞状态”,直到其他线程调用此对象的 notify() 方法或 notifyAll() 方法,或者超时的时候,当前线程被唤醒,进入可执行状态
**wait(long timeout, int nanos):**让当前线程处于“阻塞状态”,直到其他线程调用此对象的 notify() 方法或 notifyAll() 方法,或者超时的时候,或者其他线程中断当前线程的时候,当前线程被唤醒,进入可执行状态
**notify():**唤醒在此对象监视器上等待的单个线程。
**notifyAll():**唤醒在此对象监视器上等待的所有线程。yield()方法 顾名思义,yield()方法的作用就是让步,它会放弃当前所占用的cpu资源,使得其他的线程有机会去执行,然后自己从执行状态转变到可执行状态,但是,也有可能线程yield()后之后还是继续执行的,这一切都是取决于cpu的调度时机。
wait会释放锁,但yield不会释放锁。
sleep()方法 类似于wait方法,但是sleep()不会释放所持有的锁。
join()方法
join():使得当前线程的 父线程 进入阻塞状态,直到当前线程执行完毕后,父线程才会继续执行。
eg: 在A线程中调用了B线程的join()方法时,表示只有当B线程执行完毕时,A线程才能继续执行。
**join(long timeout):**在父线程等待子线程执行多久之后就变成并行执行
eg: 如果A线程中掉用B线程的join(10),则表示A线程会等待B线程执行10毫秒,10毫秒过后,A、B线程并行执行。需要注意的是,jdk规定,join(0)的意思不是A线程等待B线程0秒,而是A线程等待B线程无限时间,直到B线程执行完毕,即join(0)等价于join()。
**join(long timeout, int nanos):**在父线程等待子线程执行多久之后就变成并行执行。或者某个进程结束后执行。
join方法需要在线程进入到可执行状态后执行才有意义,也就是说,要在start()后执行。
其底层的实现是依赖于wait()方法,所以join也会释放锁。
1 2 3 4 5 6 7 8 9 10 11 12 13 14 15 16 17 18 19 20 21 22 23 24 public final synchronized void join (long millis) throws InterruptedException { long base = System.currentTimeMillis(); long now = 0 ; if (millis < 0 ) { throw new IllegalArgumentException("timeout value is negative" ); } if (millis == 0 ) { while (isAlive()) { wait(0 ); } } else { while (isAlive()) { long delay = millis - now; if (delay <= 0 ) { break ; } wait(delay); now = System.currentTimeMillis() - base; } } }
从源码中可以看到:join方法的原理就是调用相应线程的wait方法进行等待操作的,例如A线程中调用了B线程的join方法,则相当于在A线程中调用了B线程的wait方法,当B线程执行完(或者到达等待时间),B线程会自动调用自身的notifyAll方法唤醒A线程,从而达到同步的目的。
interrupt()、interrupted()、isInterrupted()方法 如果我们要创建一个线程是很简单的,只需要怎样怎样就可以了,但是要停止一个线程,却不能简单的使用Thread.stop()方法。(这里不说那种使用切换状态变量的值控制线程状态的方法)
在java中,java的中断机制是一种协作机制,也就是说通过中断并不能直接终止另一个线程,而需要被中断的线程自己处理中断。
interrupt()方法和stop()方法的差别:
interrupt()方法是设置线程的中断状态,让用户自己选择时间地点去结束线程;而stop()方法会在代码的运行处直接抛出一个ThreadDeath错误,这是一个java.lang.Error的子类。所以直接使用stop()方法就有可能造成对象的不一致性。
有这么一个状态值,记录着中断状态,interrupt status,是这样定义的
private volatile Interrupttible blocker;
默认情况下,blocker = null;
如果调用interrupt0()方法,会设置或者清除该中断状态的值。
简单介绍一下这几个方法:
public void interrupt() :
中断线程,如果线程处于阻塞状态,则中断过程会受阻,这时候会清除中断状态的值,并抛出一个异常InterruptedException
public static boolean interrupted() :
测试当前线程是否已经中断。线程中断被忽略,因为在中断时不处于活动状态的线程将由此返回 false 的方法反映出来。此方法会清除中断状态的值 。
如果当前线程已经中断,则返回 true;否则返回 false。
public boolean isInterrupted():
测试线程是否已经中断。线程中断被忽略,因为在中断时不处于活动状态的线程将由此返回 false 的方法反映出来。此方法不会影响中断状态的值 。
如果当前线程已经中断,则返回 true;否则返回 false。
1 2 3 4 5 6 7 8 public static boolean interrupted () return currentThread().isInterrupted(true ); } public boolean isInterrupted () return isInterrupted(false ); } private native boolean isInterrupted (boolean ClearInterrupted)
很多naive方法,就没有继续往下看了,推荐一篇文章 ,对底层的c++源码有所涉及。
线程终止 Thread中的stop()和suspend()方法,由于固有的不安全性,已经建议不再使用!
一般都是围绕着interrupt方法来实现这功能。
终止处于“阻塞状态”的线程 我们通过“中断”方式终止处于“阻塞状态”的线程。
1 2 3 4 5 6 7 8 9 10 @Override public void run () try { while (true ) { } } catch (InterruptedException ie) { } }
终止处于“运行状态”的线程
通过中断标记终止线程
1 2 3 4 5 6 @Override public void run () while (!isInterrupted()) { } }
通过额外的变量标记终止线程
1 2 3 4 5 6 7 8 9 10 11 12 private volatile boolean flag= true ;protected void stopTask () flag = false ; } @Override public void run () while (flag) { } }
终止任何状态的线程 将两者结合起来就可以了
1 2 3 4 5 6 7 8 9 10 11 @Override public void run () try { while (!isInterrupted()) { } } catch (InterruptedException ie) { } }
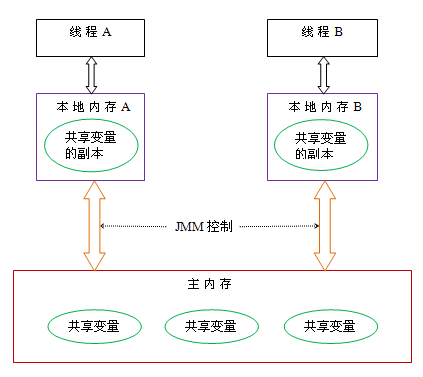
关键字volatile与synchronized java内存模型图
内存可见性问题 每一个线程都有一个属于自己的本地空间,当线程执行时,如果需要什么,会从主内存中读取对应变量的副本到本地空间,然后对该变量操作完成后,在某个时间再把这个变量同步到主内存中。
在这里,就会存在着一个问题:内存可见性
1 2 3 4 5 6 7 8 9 10 11 12 13 14 15 16 17 18 19 20 21 22 23 24 25 26 27 28 29 30 31 32 33 public class RunThread extends Thread private boolean isRunning = true ; public boolean isRunning () return isRunning; } public void setRunning (boolean isRunning) this .isRunning = isRunning; } @Override public void run () System.out.println("进入到run方法中了" ); while (isRunning == true ) { } System.out.println("线程执行完成了" ); } } public class Run public static void main (String[] args) try { RunThread thread = new RunThread(); thread.start(); Thread.sleep(1000 ); thread.setRunning(false ); } catch (InterruptedException e) { e.printStackTrace(); } } }
如果我们使用JVM -server参数执行这个程序的时候,RunThread线程并不会终止,出现了死循环。
64位的jdk默认就是启用server模式的。
线程安全问题 什么情况下会产生线程安全问题 当有多个线程在操作共享的数据且操作共享数据的线程代码有多条时,就会产生线程安全问题。
很经典的例子就是生产者-消费者模型了。
1 2 3 4 5 6 7 8 9 10 11 12 13 14 15 16 17 18 19 20 21 22 23 24 25 26 27 28 29 30 31 32 33 34 35 36 37 38 39 40 41 42 43 44 45 46 47 48 49 50 51 52 53 54 55 56 57 58 59 60 61 62 63 64 65 66 class Consumer implements Runnable Product p = null ; public Consumer (Product p) this .p = p; } @Override public void run () if (p.status) for (int i = 0 ; i < 50 ; i++){ p.pop(); } } } class Productor implements Runnable Product p = null ; public Productor (Product p) this .p = p; } @Override public void run () if (p.status) for (int i = 0 ; i < 50 ; i++){ p.push(); } } } class Product private int count = 10000 ; public boolean status = false ; public void push () count++; System.out.println("Productor push(): " + count); try { Thread.sleep(10 ); }catch (Exception e){ e.printStackTrace(); } } public void pop () int buf = count; if (buf%2 ==1 ){ System.out.println("Consumer pop(): " + buf--); count--; } try { Thread.sleep(10 ); }catch (Exception e){ e.printStackTrace(); } } } public class Test public static void main (String... args) Product p = new Product(); Thread consumer = new Thread(new Consumer(p)); Thread productor = new Thread(new Productor(p)); consumer.start(); productor.start(); p.status = true ; } }
同步锁 同步函数使用的锁是 this 。
静态的同步函数使用的锁是该函数所属 字节码文件对象 ,可以用 getClass()方法获取,也可以用 当前类名.class 表示。
同步函数和同步代码块的区别:
同步函数的锁是固定的this。
同步代码块的锁是任意的对象。
建议使用同步代码块。
1 2 3 4 5 6 7 8 9 10 11 12 13 14 15 16 17 18 19 20 21 22 23 24 25 26 27 28 29 30 31 32 33 34 35 36 37 38 39 40 41 42 43 44 45 46 47 48 49 50 51 52 53 54 55 56 57 class Ticket implements Runnable private static int num = 100 ; boolean flag = true ; public void run () { if (flag) while (true ) { synchronized (Ticket.class) { if (num>0 ) { try {Thread.sleep(10 );}catch (InterruptedException e){} System.out.println(Thread.currentThread().getName()+".....obj...." +num--); } } } else while (true ) this .show(); } public static synchronized void show () { if (num>0 ) { try {Thread.sleep(10 );}catch (InterruptedException e){} System.out.println(Thread.currentThread().getName()+".....function...." +num--); } } } class StaticSynFunctionLockDemo public static void main (String[] args) { Ticket t = new Ticket(); Thread t1 = new Thread(t); Thread t2 = new Thread(t); t1.start(); try {Thread.sleep(10 );}catch (InterruptedException e){} t.flag = false ; t2.start(); } }
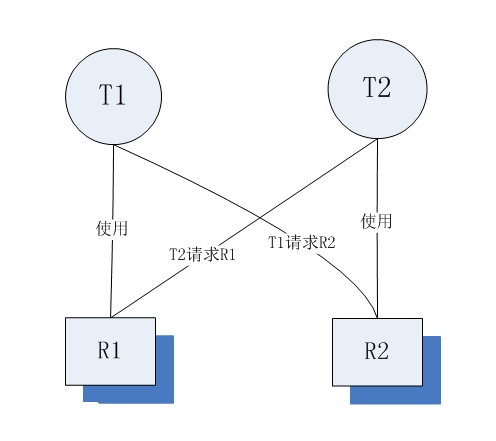
死锁 同步嵌套时,两个线程你拿了我的锁,我拿了你的锁,都不释放,造成死锁。
一个死锁情况的例子
1 2 3 4 5 6 7 8 9 10 11 12 13 14 15 16 17 18 19 20 21 22 23 24 25 26 27 28 29 30 31 32 33 34 35 36 37 38 39 class Testa implements Runnable private boolean flag; Testa(boolean flag) { this .flag = flag; } public void run () if (flag) { while (true ) synchronized (MyLock.locka) { System.out.println(Thread.currentThread().getName() + "..if locka...." ); synchronized (MyLock.lockb) { System.out.println(Thread.currentThread().getName() + "..if lockb...." ); } } } else { while (true ) synchronized (MyLock.lockb) { System.out.println(Thread.currentThread().getName() + "..else lockb...." ); synchronized (MyLock.locka) { System.out.println(Thread.currentThread().getName() + "..else locka...." ); } } } } } class MyLock public static final Object locka = new Object(); public static final Object lockb = new Object(); } class DeadLockTest public static void main (String[] args) Testa a = new Testa(true ); Testa b = new Testa(false ); Thread t1 = new Thread(a); Thread t2 = new Thread(b); t1.start(); t2.start(); } }
线程间的通信 synchronized同步 while轮询 wait/notify机制 管道通信 废话
针对多线程使用的变量如果不是volatile或者final修饰的,很有可能产生不可预知的结果(另一个线程修改了这个值,但是之后在某线程看到的是修改之前的值)。其实道理上讲同一实例的同一属性本身只有一个副本。但是多线程是会缓存值的,本质上,volatile就是不去缓存,直接取值。在线程安全的情况下加volatile会牺牲性能。
各个类与接口之间关系图(引用自SayNight 的一篇文章)